 Timeline
Transform Your Salesforce Record Experience
Timeline revolutionizes how you view and interact with your Salesforce data by providing a unified, chronological view of all activities related to your records. Whether you're tracking customer interactions, managing project milestones, or monitoring case progress, Timeline brings clarity to complex data relationships.
What is Timeline?
Timeline is a powerful Salesforce component that displays a comprehensive timeline of events, extending far beyond the capabilities of Salesforce's standard timeline component. It seamlessly integrates:
- Standard Activities: Tasks, events, and emails
- Custom Objects: Any custom records you've created
- Related Records: Indirectly connected data that provides valuable context
- Interactive Actions: Perform operations directly from timeline items through flows, custom Apex classes, or Lightning Web Components
Why Choose Timeline?
- Complete Visibility: See the full story of your records with comprehensive activity tracking
- Enhanced Productivity: Take actions directly from the timeline without switching contexts
- Administrative Control: Admins can customize what appears on the timeline and define available actions
- Flexible Integration: Works with your existing Salesforce setup and custom objects
Pricing & Features
Timeline follows a freemium model, offering essential features for free while advanced capabilities require a Timeline PRO license. Features exclusive to PRO users are marked with PRO throughout this documentation.
Timeline is made by
![]()
Basic Usage of the Timeline App
The Timeline app is designed to provide a comprehensive view of events, tasks, emails and other related records for a specific record.
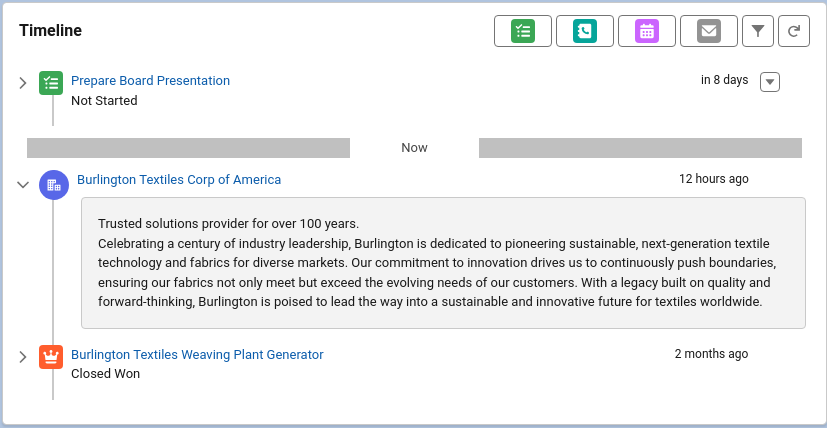
In essence, the timeline is a more flexible version of the default Salesforce activity timeline.
Using the Timeline
In order to use the timeline, the component must be setup and added to a lightning page layout. More information about the setup can be found in the configuration section.
Users of the timeline will need to be granted the Timeline User permission set.
Once configured, the timeline will display items in chronological order. You can view past and future items by scrolling through the timeline.
User interaction wit the timeline mainly happens in four places.
-
The top bar of the timeline contains buttons for global quickactions and a refresh button. The buttons in order are:
- New Task
- Log A Call
- New Event
- Send Email
- Change timeline filters
- Refresh the timeline
The first four are quickactions, the admin can choose which of these buttons are visible. The filter and refresh buttons are always visible.
-
If the item has a description, the timeline item will display an arrow button to the left of the icon and title. Clicking it will open the description for the item.
-
PRO Item Actions, the last column in the timeline, can contain a dropdown menu if actions have been defined and are available for the item.
-
Item titles can be links. Usually to the displayed record. Clicking the link will open a new tab.
Configuration
Permissions
Before the app can be used, the required permissions have to be assigned. The app comes with two permission sets, 'Timeline User' and 'Timeline Admin'. To be able to use the apps Setup page, the user needs the 'Timeline Admin' permission set.
Users that only need to view the timeline, can be assigned the 'Timeline User' permission set.
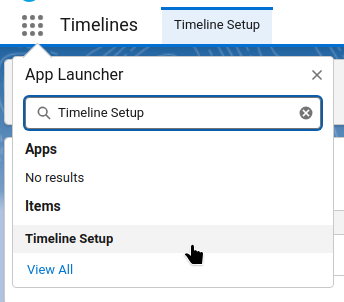
Timeline Setup
Timelines can be configured through the Setup page. The tab is visible to users with the 'Timeline Admin' permission set.
If the user has the right permissions the setup page can be found through the app launcher:
The configuration for timelines is stored in custom metadata. This means that the configuration can be developed and tested on sandbox orgs and deployed using change sets or the Salesforce Cli.
Having the configuration stored in custom metadata also means that the configuration will automatically be available in new sandboxes. However, there are some caveats:
When installing the app, a sample configuration for an account timeline included. This sample configuration can be viewed and used as basis for creating new timelines.
Since the sample configuration is created within the apps namespace it can safely be edited, when saving a new configuration outside the package namespace will be created.
Opening the Timeline Setup page shows a list of available timeline configurations. At the top left of the page are buttons to add a new configuration and to refresh the list.
Each configuration in the list has a menu with actions
- Edit
- Debug
- Refresh Cache
The debug action is described in the next chapter. The Refresh Cache action can be used to reset the org cache when the configuration has been modified through Salesforce's setup page. To improve performance of the timeline component the configuration is cached, in Salesforce's platform cache. This means that changes in the custom metadata may not be picked up by the component directly when modified through another way than the app's Setup page.
Items
A timeline setup is made up of setup items. Each setup item describes a way to place items on the timeline. There are two main types of setup items.
- Object items are records from a Salesforce object that are displayed on the timeline. The fields on the setup item describe how the record is retreived and displayed.
- PRO Apex items are provisioned through a custom apex class. This is described in the custom providers chapter.
When creating an object item most fields have a list of suggestions to choose from. Note that it is usually possible to configure values that are not in the list.
When a field name is entered that a user has no read permission on, the value of the field will be cleared before being displayed on the timeline.
The main fields used to determine which records will be shown on the timeline are parent lookup and where condition. At least one of those fields needs to be filled, when both are set the conditions are combined with the AND operator. The parent lookup field can be used if the timeline item has a lookup that references the parent object on which the timeline is shown. This can be an indirect lookup, like Opportunity.AccountId on the Order object. The where condition field can be used to add extra filters, like Stage = 'Closed Won' to only show won opportunities or to allow subqueries like RelatedToId IN (SELECT Id FROM Opportunity WHERE AccountId = :recordId) to retrieve emails related to opportunities on the account timeline. The :recordId parameter will be set to the Id of the record on which page the timeline is shown.
All fields have an info icon that will show more information about how the field is used.
Actions
PRO actions are a pro feature.
Actions have a label that will be shown in the dropdown menu. The order of the actions is determined by the Order field, lower values will be at the top.
The condition field can be used to determine when an action is shown or hidden. It should refer to a checkbox field, if the checkbox is on the action will be shown. If the fieldname is prefixed with an exclamation mark ! the action will be visible when the checkbox is off.
There are four ways in which actions can be executed, each action can use one or more ways.
- Screen flows: Will start a flow interview for the screen flow set in the action.
- Autolaunched flows: Will start a flow in the background. After the flow is finished the timeline component will refresh.
- Lightning event: Will publish an event with the given eventType on the TimelineAction lightning message channel. Lightning components on the page can listen to these events and execute actions based upon them.
- Apex Callable: Will execute an apex callable class in the background and refresh the timeline component afterwards.
Lightning Page Setup
On lightning record pages the timeline component can be found under 'Custom - Managed' components with label 'Record Timeline'.
When the component is placed on a record page it will have several settings available.
- The main one is the configuration record that should be used. The picklist is automatically filtered on object type, so a configuration has to exist before adding the component to a page.
- The second one is the order, the timeline can be shown in ascending or descending order. The default is descending.
- Debug mode can be turned on to show warning messages if a user has no permissions on fields that are set up to be used. These fields are filtered from the result set, and will show up as an empty value (
null). When this option is not off the user may not notice that some information is missing. - The next four options can be used to enable or disable the quick action buttons at the top of the component. In order they are 'New Task', 'Log a Call', 'New Event' and 'Send Email'.
Debugging Timeline Items
The Timeline app provides a powerful debug tool that helps administrators and developers troubleshoot timeline configuration issues, test queries, and identify field permission problems. This tool is accessible through the Timeline Setup page and provides detailed insights into how timeline items are retrieved and displayed.
Accessing the Debug Tool
- Navigate to the Timeline Setup page (available in the App Launcher under "Timeline Setup")
- Find the timeline configuration you want to debug in the list
- Click the Actions menu (dropdown button) to the right of the configuration
- Select Debug from the dropdown menu
This will open the debug interface in a new mode within the Timeline Setup page.
Debug Tool Interface
The debug tool interface is split into two main sections:
Left Panel - Live Timeline Preview
- Parent Record Id Input: Enter the ID of a specific record to test the timeline against
- Timeline Preview: Shows a live preview of the timeline component in debug mode, displaying any warning messages for missing field permissions or other issues
Right Panel - Query Analysis
- Query Breakdown: Shows individual queries for each timeline setup item, organized in expandable sections
- Query Execution: Execute the chosen query and display the results as JSON.
Understanding Query Sections
Each timeline setup item gets its own expandable section in the right panel:
Query Display
- Raw Query: Shows the exact SOQL query that will be executed for this timeline item
- Parameter Substitution: When you enter a Parent Record Id, the query shows with actual values substituted for parameters like
:recordId,:ownerId, etc. - Copy to Clipboard: Use the copy icon to copy the query and test it directly in the Developer Console or other SOQL tools
Query Execution
- Run Query Button: Execute the query with the current parameters and filters
- Results Display: Shows the raw JSON results returned by the query
- Debug Messages: Displays any field permission warnings or other debugging information
Common Debug Scenarios
1. No Timeline Items Appearing
Symptoms: Timeline is empty or missing expected items
Debug Steps:
- Enter a valid Parent Record Id in the debug tool
- Check each query section to see if queries are returning results
- Look for error messages in the query results
- Verify the parent lookup field is correctly configured
- Check if WHERE conditions are too restrictive
2. Field Permission Issues
Symptoms: Timeline items appear but some information is missing
Debug Information:
- Debug messages will show
Field '[FieldName]' is not accessible on '[ObjectName]' - These messages appear both in the live timeline preview and in the query results
- Fields without read permissions are automatically filtered out by Salesforce security
Resolution:
- Grant the user appropriate field-level permissions
- Or remove the inaccessible fields from the timeline setup configuration
3. Query Performance Issues
Symptoms: Timeline loads slowly or times out
Debug Steps:
- Copy queries from the debug tool
- Run them in the Developer Console Query Editor
- Check query execution time and row counts
- Look for missing indexes or inefficient WHERE conditions
- Consider adding more restrictive filters to limit result sets
4. Date Filtering Problems
Symptoms: Timeline shows incorrect items for selected date ranges
Debug Steps:
- Use different date filter options in the debug tool (All Time, Last 7 Days, Last 30 Days, etc.)
- Examine how date parameters are substituted in the queries
- Verify the time field configuration is correct
- Check if the time field is a Date or DateTime type and ensure proper filtering
Debug Mode in Production
The Timeline component itself also supports debug mode for end users:
Lightning Record Pages
When configuring the Timeline component on a Lightning record page:
- Edit the page in Lightning App Builder
- Select the Timeline component
- Enable the Debug Mode property
- Save and activate the page
This will show field permission warnings directly in the timeline for end users, helping them understand why certain information might be missing.
Debug Mode Features
- Shows warning messages for inaccessible fields
- Displays tooltips explaining why certain timeline items might be incomplete
- Helps users understand field-level security impacts
Best Practices for Debugging
1. Test with Different User Profiles
- Use the debug tool while logged in as users with different permission sets
- Check how field-level security affects timeline display
- Ensure timeline items appear correctly for all intended user types
2. Query Optimization
- Monitor query row counts in debug results
- Keep queries under the 2000 record limit
- Use appropriate WHERE conditions to filter results
- Consider date range limitations for better performance
3. Regular Maintenance
- Periodically check debug messages for new field permission issues
- Test timeline configurations after permission set changes
- Verify queries still work after Salesforce releases or customizations
4. Documentation
- Document any custom configurations or workarounds discovered during debugging
- Keep notes about field permission requirements for each timeline setup
- Share debugging insights with other administrators
Troubleshooting Common Error Messages
| Error Message | Cause | Resolution |
|---|---|---|
| "Object not accessible" | User lacks object-level read permission | Grant object read permission via permission set or profile |
| "Field 'X' is not accessible" | Missing field-level read permission | Add field read permission or remove field from configuration |
| "No active timeline setup found" | Timeline setup is inactive or doesn't exist | Activate the setup or check the configuration name |
| "Query timeout" | Query is too complex or returns too many records | Add more restrictive filters or optimize query conditions |
Custom Providers
PRO Custom Providers are a Timelines Pro feature.
Custom providers allow you to create timeline items through custom Apex code by implementing the tln_TimelineItemProvider interface. This gives you complete flexibility to source timeline data from external systems, perform complex calculations, or aggregate data from multiple objects.
The tln_TimelineItemProvider Interface
The interface is simple but powerful:
global interface tln_TimelineItemProvider {
	List<afp.tln_TimelineItem> getItems(Id recordId, Datetime minDate, Datetime maxDate, String ownerId);
}
Interface Parameters
- recordId: The ID of the record where the timeline is being displayed
- minDate: The earliest date for items to display (based on timeline date filter)
- maxDate: The latest date for items to display (based on timeline date filter)
- ownerId: The ID of the user viewing the timeline (used for "My Items" filtering)
tln_TimelineItem Class
global with sharing class tln_TimelineItem implements Comparable {
	// Constructor
	global tln_TimelineItem();

	// Getter methods
	global String getDescription();
	global String getTitle();
	global String getSubtitle();
	global String getRecordId();
	global String getIconName();
	global Boolean getRich();
	global String getLink();
	global Datetime getLastOpenedDate();
	global Boolean getHasAttachments();
	global Boolean getHighPriority();
	global List<tln_TimelineAction> getActions();
	global Date getDate();
	global Datetime getDateTime();

	// Setter methods
	global void setDescription(String descr);
	global void setTitle(String title);
	global void setSubtitle(String subtitle);
	global void setRecordId(String recordId);
	global void setIconName(String iconName);
	global void setRich(Boolean rich);
	global void setLink(String link);
	global void setLastOpenedDate(Datetime lastOpenedDate);
	global void setHasAttachments(Boolean hasAttachments);
	global void setHighPriority(Boolean highPriority);
	global void addAction(tln_TimelineAction action);
	global void setDate(Date value);
	global void setDate(Datetime value);

	// Comparable implementation
	global Integer compareTo(Object compareTo);
}
tln_TimelineAction Class
global with sharing class tln_TimelineAction implements Comparable {
	// Constructor
	global tln_TimelineAction();

	// Getter methods
	global String getLabel();
	global String getScreenFlowApiName();
	global String getAutoLaunchedFlowApiName();
	global String getApexCallableName();
	global String getLightningEventType();
	global Decimal getOrder();

	// Setter methods
	global void setLabel(String label);
	global void setScreenFlowApiName(String screenFlowApiName);
	global void setAutoLaunchedFlowApiName(String autoLaunchedFlowApiName);
	global void setApexCallableName(String apexCallableName);
	global void setLightningEventType(String lightningEventType);
	global void setOrder(Decimal order);

	// Comparable implementation
	global Integer compareTo(Object compareTo);
}
Creating a Custom Provider
Step 1: Implement the Interface
Create an Apex class that implements afp.tln_TimelineItemProvider:
global with sharing class MyCustomProvider implements afp.tln_TimelineItemProvider {
	global List<afp.tln_TimelineItem> getItems(Id recordId, Datetime minDate, Datetime maxDate, String ownerId) {
		List<afp.tln_TimelineItem> items = new List<afp.tln_TimelineItem>();

		// Your custom logic here
		// Query external systems, aggregate data, etc.

		return items;
	}
}
Step 2: Build Timeline Items
Create tln_TimelineItem objects using the available setter methods:
afp.tln_TimelineItem item = new afp.tln_TimelineItem();

// Required fields
item.setRecordId(recordId);                    // ID of the related record
item.setTitle('My Custom Timeline Item');      // Main title
item.setDate(Datetime.now());                  // Timeline date/time

// Optional display fields
item.setSubtitle('Additional context');        // Subtitle text
item.setDescription('Detailed description');   // Main description
item.setRich(true);                            // Enable HTML in description
item.setIconName('standard:event');            // Salesforce icon name
item.setLink(recordId);                        // Navigation link or Id of the record to link to
item.setLastOpenedDate(Datetime.now());        // Last viewed timestamp
item.setHasAttachments(true);                  // Show attachment indicator
item.setHighPriority(true);                    // Show priority indicator
Step 3: Add Actions (Optional)
Timeline items can include interactive actions:
// Create an action
afp.tln_TimelineAction action = new afp.tln_TimelineAction();
action.setLabel('Custom Action');
action.setApexCallableName('MyCallableClass:executeAction');
item.addAction(action);

// Other action types
action.setScreenflowApiName('My_Screen_Flow');           // Launch screen flow
action.setAutoLaunchedflowApiName('My_Auto_Flow');       // Launch auto flow
action.setLightningEventType('CustomEventType');         // Publish Lightning event
Complete Example
Here's a complete example that creates timeline items from external API data:
global with sharing class ExternalApiProvider implements afp.tln_TimelineItemProvider {
	global List<afp.tln_TimelineItem> getItems(Id recordId, Datetime minDate, Datetime maxDate, String ownerId) {
		List<afp.tln_TimelineItem> items = new List<afp.tln_TimelineItem>();

		try {
			// Get account email for external API lookup
			Account acc = [SELECT Email__c FROM Account WHERE Id = :recordId LIMIT 1];
			if (String.isBlank(acc.Email__c)) {
				return items;
			}

			// Call external API (implement your HTTP callout)
			List<ExternalEvent> externalEvents = callExternalAPI(acc.Email__c, minDate, maxDate);

			// Convert external events to timeline items
			for (ExternalEvent event : externalEvents) {
				afp.tln_TimelineItem item = new afp.tln_TimelineItem();

				item.setRecordId(recordId);
				item.setTitle(event.eventName);
				item.setSubtitle('External System Event');
				item.setDescription(buildDescription(event));
				item.setRich(true);
				item.setDate(event.eventDate);
				item.setIconName('standard:event');
				item.setLink(event.externalUrl);

				// Add custom action
				afp.tln_TimelineAction syncAction = new afp.tln_TimelineAction();
				syncAction.setLabel('Sync to Salesforce');
				syncAction.setApexCallableName('ExternalEventSync:syncEvent');
				item.addAction(syncAction);

				items.add(item);
			}
		} catch (Exception e) {
			// Handle errors gracefully
			System.debug('Error in ExternalApiProvider: ' + e.getMessage());

			// Optionally create an error timeline item
			afp.tln_TimelineItem errorItem = new afp.tln_TimelineItem();
			errorItem.setRecordId(recordId);
			errorItem.setTitle('External API Error');
			errorItem.setDescription('Failed to load external events: ' + e.getMessage());
			errorItem.setDate(Datetime.now());
			errorItem.setIconName('utility:error');
			items.add(errorItem);
		}

		return items;
	}

	private List<ExternalEvent> callExternalAPI(String email, Datetime minDate, Datetime maxDate) {
		// Implement your external API call here
		// Return parsed external events
		return new List<ExternalEvent>();
	}

	private String buildDescription(ExternalEvent event) {
		return '<p><strong>Event Type:</strong> ' +
			event.eventType +
			'</p>' +
			'<p><strong>Details:</strong> ' +
			event.details +
			'</p>' +
			'<p><a href="' +
			event.externalUrl +
			'" target="_blank">View in External System</a></p>';
	}

	// Inner class for external event data
	public class ExternalEvent {
		public String eventName;
		public String eventType;
		public String details;
		public Datetime eventDate;
		public String externalUrl;
	}
}
Configuring Custom Providers
Setup Configuration
- Navigate to the Timeline Setup page
- Create a new timeline setup or edit an existing one
- Add a new setup item
- Select "Custom Apex Class" as the provision type
- Choose your provider class from the dropdown
When configuring the setup item through Salesforce Setup > custom metadata instead, the Item Object field should use the format:
apex:namespace.YourProviderClassName
Best Practices
Performance Considerations
- Limit data volume: Return only essential timeline items within the date range
- Use efficient queries: Optimize any SOQL queries in your provider
- Handle timeouts: External API calls should have appropriate timeout handling
- Cache when possible: Consider caching external data to improve performance
Error Handling
global List<afp.tln_TimelineItem> getItems(Id recordId, Datetime minDate, Datetime maxDate, String ownerId) {
    List<afp.tln_TimelineItem> items = new List<afp.tln_TimelineItem>();

    try {
        // Your provider logic

    } catch (CalloutException e) {
        // Handle API timeouts/failures
        System.debug('Callout failed: ' + e.getMessage());
        // create an error timeline item
        afp.tln_TimelineItem errorItem = new afp.tln_TimelineItem();
        errorItem.setRecordId(recordId);
        errorItem.setTitle('External API Error');
        errorItem.setDescription('Failed to load external events: ' + e.getMessage());
        errorItem.setDate(Datetime.now());
        errorItem.setIconName('utility:error');
        items.add(errorItem);
    } catch (Exception e) {
        // Handle other errors
        System.debug('Provider error: ' + e.getMessage());
		// create an error timeline item
        afp.tln_TimelineItem errorItem = new afp.tln_TimelineItem();
        errorItem.setRecordId(recordId);
        errorItem.setTitle('My Item Error');
        errorItem.setDescription('Failed to load timeline items: ' + e.getMessage() + '\n' + e.getStackTraceString());
        errorItem.setDate(Datetime.now());
        errorItem.setIconName('utility:error');
        items.add(errorItem);
    }

    return items; // Always return a list, even if empty
}
Security
- Use
with sharing: Ensure your provider class respects sharing rules - Validate parameters: Check that recordId and other parameters are valid
- Sanitize external data: Clean any data from external sources before display
- Permission checks: Verify user permissions for sensitive operations
Date Filtering
Respect the provided date parameters to ensure good performance:
// If possible filter the items in SOQL as much as possible
String queryString =
    'SELECT ... ' +
    'FROM MyObject__c ' +
    'WHERE (MyDateField__c >= :minDate AND MyDateField__c <= :maxDate) ' +
	(String.isNotBlank(ownerId) ? 'AND OwnerId = :ownerId ' : '') +
    'AND ... SomeOtherField__c = :recordId ... ' +
    'ORDER BY MyDateField__c ASC ' +
    'LIMIT 100 ';
for (MyObject__c record: Database.query(queryString)) {
    // Create the timeline item
}

// When not using SOQL, filter your data source by the provided date range
if (myItem.eventDate >= minDate && myItem.eventDate <= maxDate) {
    // Include myItem
}
Owner Filtering
When ownerId is provided, filter items to show only those relevant to that user:
// Filter in SOQL as shown in the example above, or
// Example: only show items where the user is the owner or participant
if (String.isBlank(ownerId) || myItem.OwnerId == ownerId) {
    // Include myItem
}
Testing Custom Providers
Create test classes to ensure your provider works correctly:
@isTest
public class ExternalApiProviderTest {
	@isTest
	static void testGetItems() {
		// Setup test data
		Account testAccount = new Account(Name = 'Test Account', Email__c = 'test@example.com');
		insert testAccount;

		// Test the provider
		Test.startTest();
		ExternalApiProvider provider = new ExternalApiProvider();
		List<afp.tln_TimelineItem> items = provider.getItems(
			testAccount.Id,
			Datetime.now().addDays(-30),
			Datetime.now().addDays(30),
			UserInfo.getUserId()
		);
		Test.stopTest();

		// Verify results
		Assert.isNotNull(items, 'Items list should not be null');
		// Add more specific assertions based on your logic
	}
}
Troubleshooting
Provider Not Found Error
If you see "Invalid provider class" errors:
- Verify the class name is spelled correctly in the setup
- Ensure the class implements
afp.tln_TimelineItemProvider - Check that the class is global and active
- Confirm proper namespace prefix if applicable
Empty Timeline
If your provider returns no items:
- Check debug logs for any exceptions in your provider
- Verify the date range parameters are being respected
- Ensure your provider logic matches the test data
- Test your provider directly in anonymous Apex
Performance Issues
If the timeline loads slowly:
- Review your provider's query efficiency
- Consider limiting the number of items returned
- Add appropriate indexes to custom objects
- Optimize external API calls and add caching
Plugin Components
Timeline plugins are Lightning Web Components that can interact with and control the Timeline component. They use the Lightning Message Service to communicate with the Timeline component and can trigger various actions like refreshing the timeline, applying filters, and responding to timeline events.
Architecture
Timeline plugins work through a bidirectional communication system:
- Outbound Events: Plugins can send publish events to the
TimelineEvent__cmessage channel - Inbound Events: Plugins can subscribe to Timeline events via the
TimelineEvent__cmessage channel - Context Sharing: Plugins can share context data with the Timeline component
Message Channel
The Timeline system uses the TimelineEvent__c Lightning Message Channel for communication between components. The message structure includes:
recordId: The record ID that the action is executed onparentId: The record ID of the record on which the timeline component is shownsetupName: The API name of the timeline setup recordcontext: A context object containing extra information for the actioneventType: The type of event being triggered
Plugin Structure
Basic Plugin Setup
A timeline plugin must extend LightningElement and implement the message channel subscription:
import {LightningElement, api, wire} from "lwc";
import {publish, subscribe, unsubscribe, MessageContext} from "lightning/messageService";
import timelineEvent from "@salesforce/messageChannel/afp__TimelineEvent__c";

export default class TimelinePlugin extends LightningElement {
	@api recordId;
	@api objectApiName;

	@wire(MessageContext)
	messageContext;

	subscription = null;

	connectedCallback() {
		this.subscribeToMessageChannel();
		this.setInitialContext();
	}

	disconnectedCallback() {
		this.unsubscribeToMessageChannel();
	}

	subscribeToMessageChannel() {
		if (!this.subscription) {
			this.subscription = subscribe(this.messageContext, timelineEvent, (message) => this.handleMessage(message));
		}
	}

	unsubscribeToMessageChannel() {
		unsubscribe(this.subscription);
		this.subscription = null;
	}

	handleMessage(message) {
		// Handle incoming timeline events
		console.log("Timeline action received:", message);
	}
}
Component Metadata
The plugin component must be exposed in its metadata file:
<?xml version="1.0" encoding="UTF-8" ?>
<LightningComponentBundle xmlns="http://soap.sforce.com/2006/04/metadata">
    <apiVersion>62.0</apiVersion>
    <isExposed>true</isExposed>
    <masterLabel>Timeline Plugin</masterLabel>
    <targets>
        <target>lightning__RecordPage</target>
    </targets>
</LightningComponentBundle>
Plugin Events
Outbound Events (Plugin → Timeline)
Plugins can publish messages to the Timeline component using the Lightning Message Channel:
setcontext Event
Sets context data for the plugin:
setInitialContext() {
    publish(this.messageContext, timelineEvent, {
        eventType: "tln__setContext",
        context: {
            pluginName: "ExamplePlugin",
            initialized: new Date().toISOString(),
        },
    });
}
setfilter Event
Applies filters to the timeline:
applyFilter() {
    const filterDetails = {
        dateFilter: "all_time",     // Options: "all_time", "last_7_days", "next_7_days", "last_30_days", "custom"
        myItems: false,             // Show only current user's items
        minDate: null,              // Start date for custom filter
        maxDate: null,              // End date for custom filter
        allowedSetupItems: null,    // Array of allowed setup item names
    };

    publish(this.messageContext, timelineEvent, {
        eventType: "tln__setFilter",
        context: filterDetails,
    });
}
refresh Event
Triggers a timeline refresh:
refreshTimeline() {
    publish(this.messageContext, timelineEvent, {
        eventType: "tln__refresh",
    });
}
Inbound Events (Timeline → Plugin)
The Timeline component publishes various events that plugins can subscribe to:
System Events (prefixed with tln__)
tln__initialized: Fired when the Timeline component is initialized
Action Events
Timeline items can trigger custom action events based on their configuration. These events contain:
eventType: The type of action (e.g., "view_record", "edit_record")recordId: The ID of the record being acted uponparentId: The ID of the parent recordsetupName: The timeline setup namecontext: Additional context data
Outbound events (Plugin → Timeline)
tln__refresh: Can be used to manually refresh the timelinetln__setFilter: Can be used to set the filter of the timelinetln__setContext: Can be used to set a context object that will be shared with actions
Filter Options
When applying filters through the tln__setFilter event, use the following message structure:
{
	eventType: "tln__setFilter",
	context: {
		dateFilter: "custom",
		myItems: false,
		minDate: new Date(2025, 0, 1), // In javascript January is month 0
		maxDate: null,
		allowedSetupItems: ["MyProvider"],
	},
}
You can use the following options:
Date Filters
"all_time": Show all timeline items regardless of date"last_7_days": Show items from the past 7 days"next_7_days": Show items for the next 7 days"last_30_days": Show items from the past 30 days"custom": Use custom date range withminDateandmaxDate
minDate and maxDate are ignored when dateFilter is not "custom".
User Filters
myItems: true: Show only items assigned to the current usermyItems: false: Show all items
Setup Item Filters
allowedSetupItems: ["Provider1", "Provider2"]: Show only items from specific providers. Use API names of TimelineSetupItems as values.allowedSetupItems: null: Show items from all providers
Example Implementation
Here's a complete example of a timeline plugin with filtering capabilities:
import {LightningElement, api, wire} from "lwc";
import {ShowToastEvent} from "lightning/platformShowToastEvent";
import {publish, subscribe, unsubscribe, MessageContext} from "lightning/messageService";
import timelineEvent from "@salesforce/messageChannel/afp__TimelineEvent__c";

export default class ExampleTimelinePlugin extends LightningElement {
	@api recordId;
	@api objectApiName;
	@api setupName;

	@wire(MessageContext)
	messageContext;

	subscription = null;
	selectedFilter = "all";

	filterOptions = [
		{label: "All", value: "all"},
		{label: "My Items", value: "my_items"},
		{label: "Recent", value: "recent"},
	];

	connectedCallback() {
		this.subscribeToMessageChannel();
		this.setInitialContext();
	}

	disconnectedCallback() {
		this.unsubscribeToMessageChannel();
	}

	subscribeToMessageChannel() {
		if (!this.subscription) {
			this.subscription = subscribe(this.messageContext, timelineEvent, (message) => this.handleMessage(message));
		}
	}

	unsubscribeToMessageChannel() {
		unsubscribe(this.subscription);
		this.subscription = null;
	}

	setInitialContext() {
		publish(this.messageContext, timelineEvent, {
			eventType: "tln__setContext",
			context: {
				pluginName: "ExamplePlugin",
				initialized: new Date().toISOString(),
			},
		});
	}

	handleFilterChange(event) {
		this.selectedFilter = event.target.value;
		this.applyFilter();
	}

	applyFilter() {
		const filterDetails = {
			dateFilter: "all_time",
			myItems: false,
			minDate: null,
			maxDate: null,
			allowedSetupItems: null,
		};

		if (this.selectedFilter === "my_items") {
			filterDetails.myItems = true;
		} else if (this.selectedFilter === "recent") {
			filterDetails.dateFilter = "custom";
			filterDetails.minDate = new Date(Date.now() - 864000000); // 10 days ago
		}

		publish(this.messageContext, timelineEvent, {
			eventType: "tln__setFilter",
			context: filterDetails,
		});
	}

	refreshTimeline() {
		publish(this.messageContext, timelineEvent, {
			eventType: "tln__refresh",
		});
		this.showToast("Success", "Timeline refreshed", "success");
	}

	handleMessage(message) {
		if (message.eventType === "tln__initialized") {
			this.setInitialContext();
			return;
		}
		console.log("Timeline action received:", message);

		this.showToast("Timeline Action", `Action ${message.eventType} triggered for record ${message.recordId}`, "info");
	}

	showToast(title, message, variant) {
		this.dispatchEvent(
			new ShowToastEvent({
				title,
				message,
				variant,
			})
		);
	}
}
HTML Template Example
<template>
	<div class="slds-card slds-var-p-around_small">
		<div class="slds-card__header">
			<h2 class="slds-card__header-title">Timeline Controls</h2>
		</div>
		<div class="slds-card__body">
			<lightning-combobox
				name="filter"
				label="Filter Timeline"
				value="{selectedFilter}"
				placeholder="Select Filter"
				options="{filterOptions}"
				onchange="{handleFilterChange}"
			>
			</lightning-combobox>

			<lightning-button
				class="slds-var-m-top_small"
				label="Refresh Timeline"
				onclick="{refreshTimeline}"
				variant="brand"
			>
			</lightning-button>
		</div>
	</div>
</template>
Deployment
To deploy a timeline plugin:
- Create the Lightning Web Component with the appropriate structure
- Ensure the component metadata exposes it for the Lightning Record Page
- Add the plugin component to your Lightning Record Page layout
- The plugin will automatically communicate with any Timeline components on the same page
Best Practices
- Always subscribe and unsubscribe: Use
connectedCallback()anddisconnectedCallback()to manage message channel subscriptions - Handle system events: Filter out system events (prefixed with
tln__) in your message handler - Set initial context: Since the order in which lightning web components are created on a page is not guaranteed, call
setInitialContext()inconnectedCallback()and after receivingtln__initialized. The first in case the timeline is initialized before the plugin and the second in case the plugin is initialized before the timeline.